Troubleshooting High SQL Server CPU on Amazon RDS

Today’s scenario consists of a db.m6i.2xlarge Amazon RDS instance running Microsoft SQL Server Web Edition. A newer “greenfield” web application has a larger number of users hitting it during work hours.

An alert indicated that the server was nearing its CPU capacity. To start our investigation, we examine the instance’s Monitoring tab and see that the “CPUUtilization” metric indeed indicates an issue. This chart shows a server restart around the 17:35 mark to free up some resources. However, it quickly rockets back up.

Next, we examine our Database Insights (which you will need to activate in advance). Here we see CPU waits exceeding our max vCPU threshold, indicating an issue.

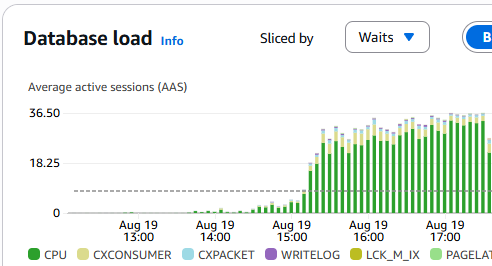
We then scroll down to the “Top SQL” tab and see that our most considerable wait (taking up 5.44% of the database load at the time of this screenshot, a few hours after the fix) is our target SQL query.

One of the items that we double-checked and found as an oversight was that the max degrees of parallelism (MAXDOP) parameter was set to 0 (unlimited). When using OLTP, or Online Transaction Processing, it’s best to set it to 1, effectively disabling parallelism. It ensures that no single query can consume too many resources, leaving processor cores available for other user requests. This improves overall system responsiveness and throughput.

However, after setting this to 1 and rebooting the instance, we found the primary issue remained. MAXDOP issues tend to be reflected as “CXPACKET” waits instead of “CPU” waits, and you can see all the “CXPACKET” waits, shown in light blue in the screenshot chart below, ceased at 18:30 when the parameter was changed from 0 to 1 and the server was emergency restarted.

During troubleshooting, developers optimized the query to join on a primary ID and then do a fuzzy search. Per the developer, the previous query was not utilizing the indexes properly.

At about 19:30 on the chart, the optimized query was pushed to production. The SQL Server was then emergency restarted to clear the hanging queries. You can see that the issue was then resolved with a practical database load and wait metric.

Random monitoring for a few hours confirmed that the fixes have resolved the issue.

In conclusion, utilize AWS RDS’s database insights and CloudWatch monitoring tools to look for clues. Often, on an OLTP stack, database waits become an issue that manifests as slow-loading web pages. Use application performance monitors (APM) such as FusionReactor for ColdFusion and Lucee servers to help you narrow down troublesome issues.

As a side note, while restarting production databases during normal hours is never great, you have to weigh the benefits. In this case a minute or two of downtime won over endless lag. Credit goes to Amazon RDS for a very speedy server restart. We were back up within a minute or two at most after hitting restart!

#aws, #database, #microsoft, #rds, #sql

Is it Cheaper to run Windows Servers on Azure than AWS?

Spoiler alert; the answer is yes. And by quite a bit. But with reservations. You have to look at the whole picture.

I took an example linked AWS account that had two Windows EC2 compute instances currently running. Both are webservers, one for production and one for staging. The following monthly cost comparisons use both on demand and savings plans that are for 1-year commitments with no down payment as this is typical for me.

AWS InstanceOn DemandSavings PlanAzure InstanceOn DemandSavings Plan
t3a.2xlarge$327$266B8ms$247$171
m7i-flex.2xlarge$535$461D8d v5$330$226

As you can see, I could potentially be saving up to $330 on just these two instances by moving to Azure from AWS. $3,960/yr is a decent vacation or maybe a paycheck. So why not switch cloud providers? Well, there is the cost of learning a new infrastructure and dealing with all the nuances that come with it. But in this specific case, it’s managed database services.

The following compares single AZ Microsoft SQL Server Web Edition on Amazon RDS with Provisioned vCore Azure SQL Database. Note that Azure SQL Database is edition agnostic. There is also Azure managed SQL, but that’s even more expensive. We won’t be comparing AWS reserved instances to Azure reserved instances because we may never buy a reserved RDS instance on AWS for this account. Once you buy it, you are very locked in. No instance type or size exchanges, nor selling it on a marketplace. But you can see, a reserved instance on Azure is still more expensive than AWS on demand.

AWS InstanceOn DemandAzure InstanceOn DemandReserved Capacity
db.m6i.xlarge$430D4s v5$737$581
db.m6i.2xlarge$890D8s v5$1,105$1,162

Find that odd? You actually get a better value on Azure when comparing it to the standard or enterprise edition. However, I deal primarily with Web and Express editions. The majority of applications I handle don’t require the functionality or redundancy built into standard and enterprise editions. However, if you were to require standard or enterprise, I would strongly suggest looking at using Azure to save you quite a bit of money, or start using Linux and an alternative database technology like Aurora on AWS.

When we factor in the managed database, we now do not find value moving to Azure from AWS as the realized savings is now lost. Yes there are options to spin up the database on a VM and manage it ourselves, but now you are adding in monthly labor costs and additional license costs for backups, not to mention the lost performance gains RDS or Azure SQL Database brings.

In conclusion, hosting Windows servers on Azure over AWS can save you money. But you need to factor in all the services, even beyond the database, including system administration labor and 3rd parties utility integration. Why can Azure have potentially significant savings on Windows servers? Because Microsoft owns both the infrastructure and the licenses. They do not translate the same license discounts to other cloud providers. For example, you used to be able to bring your own SQL license to AWS RDS, but that was discontinued some time ago.

Note: Turn off the “Azure Hybrid Benefit” slider when viewing Azure pricing. This option requires bringing your own license and does not facilitate an accurate pricing comparison.

If you are interested, Microsoft has an official AWS-to-Azure compute mapping guide; however, I used Microsoft Copilot to help me find the equivalent instance types and sizes. There are also web utilities that map them you can search for.

#aws, #azure, #comparison, #compute, #cost

Removing Emails from Amazon SES Account Level Suppression List Using CloudShell

There are a number of methods for removing emails from the Amazon Simple Email Service (SES) Account Level Suppression List. But underneath they all use the API. This could be via a native API library, importing a file in the console UI, using the CloudShell, and more. But one thing is for certain, the Console UI does not make the practical. You must use the CLI/API in one way or another.

For purposes of this article, we will use the CloudShell. I write this because after asking Amazon Q and doing some Google searches, they all failed. I ended up with a good answer from the handy Stack Overflow post Remove Email from AWS SES Suppression List by user “Jawad“, even though it wasn’t marked as the accepted response.

Just a forewarning, there’s nothing fast about this. It iterates about one email per second, so expect to be monitoring this for a while.

The CloudShell can be access by pressing the “CloudShell” icon in the top header of the AWS console. It looks like a command prompt inside of a window icon. It will default to the region you have currently selected.

 #Purge Amazon SES Account Level Suppression List

 # AWS CLI command to list all email addresses in the suppression list
 suppression_list=$(aws sesv2 list-suppressed-destinations)

 # Extracting email addresses from the suppression list
 email_addresses=$(echo $suppression_list | jq -r '.SuppressedDestinationSummaries[].EmailAddress')

 # Loop through each email address and remove it from the suppression list
 for email in $email_addresses; do
   echo "Removing $email from the suppression list..."
   aws sesv2 delete-suppressed-destination --email-address $email
 done

 echo "This page of emails purged. Rerun this script to delete further potential pages of emails, if emails were deleted."

Once you run this script, if emails were listed as deleted, run it again. Additionally, changes may take up to 48 hours to propagate. You may find the email still has the status that it is on the suppression list until it propagates.

The command list-suppressed-destinations retrieves the first page of up to 1,000 objects (default), which includes the email. At the end of the returned suppression_list value, if a “NextToken” string is defined, there are more emails still in the list. You can add a --no-paginate parameter to the command to turn off pagination, but depending on the size of your list, it’s possible you may run into unexpected issues, like memory limitations, that I have not tested for. See command documentation.

You can adapt this script to a CLI outside of the CloudShell by adding in --region <your-region> property to the list-suppressed-destinations and delete-suppressed-destination commands.

The other methods that were introduced that I found seem to have failed mostly because they introduced/kept double quotes around the email address, leading to the following error during the delete-suppressed-destination command:

An error occurred (NotFoundException) when calling the DeleteSuppressedDestination operation: Email address (email address) does not exist on your suppression list.

#amazon, #aws, #cli, #cloudshell, #email, #script, #ses, #suppression-list

Always Encrypt AWS EC2 Instances

When running a business and the goal is to become successful, you may inevitably fill out a risk assessment questionnaire that asks, “Is all your data encrypted at risk?”. And when you start looking at your list of EBS volumes created over the past period of time, you might be surprised to learn that the “encrypted” property of your volumes very well might equal “false”. NVMe instance store volumes are encrypted, but many EC2 solutions rely on EBS volumes, and they are not encrypted by default.

Encryption at rest for Amazon Elastic Block Store (EBS) volumes protects data when it’s not in use. It ensures that data stored on the physical storage media in an AWS data center is unreadable to anyone without the appropriate decryption key. Many argue this is a fundamental component of a strong security strategy, and they are not wrong.

AWS leverages its Key Management Service (KMS) to manage the encryption keys. You can use the default AWS-managed keys or create and manage your own customer-managed keys (CMKs) for more control over key policies, access permissions, and rotation schedules.

Does encryption at rest really matter while at an AWS data center, specifically? Unless you are dealing with classified information, probably not. AWS has an amazing level of virtual security separating your data from bad actors, both virtually and physically. The chances of someone walking off with your data medium (hard drive) are slim to none, and when the medium goes bad, the destruction and audit process is equally impressive. But at the end of the data, it matters to someone’s boss, their investors, policies, perception, and potentially your career. Many industry regulations and security standards, such as HIPAA, PCI DSS, and GDPR, require that sensitive data be encrypted at rest.

Security is like an onion with many layers. While AWS has robust physical and logical security controls in place, encryption at rest adds another vital layer of protection. This “defense-in-depth” approach ensures that even if one security control fails, others are there to prevent a breach.

Encryption isn’t limited to just the EBS volume itself. Per AWS documentation, when you encrypt an EBS volume, any snapshots you create from it and any subsequent volumes created from those snapshots will also be automatically encrypted. This provides an end-to-end security envelope for your data’s entire lifecycle.

So why not do it? The list of reasons is small, but you need to be aware of them, especially when dealing with AMIs and cross-region copies:

  • Very minimal increase in latency (typically negligible)
  • If a key becomes unusable (disabled or deleted), you cannot access the encrypted volume data until the key is restored
  • Additional key management overhead may be necessary if you opt to manage your own keys
  • AMIs with encrypted snapshots cannot be shared publicly – only with specific AWS accounts
  • Cannot directly copy encrypted snapshots to another region (must re-encrypt with destination region key)
  • Minimal additional cost for AWS KMS key usage

When creating an EC2 instance, the default view does not encrypt the volume. You will need to press the “Advanced” link in the “Configure storage” section first.

Then, expand your volume details. Next, change the “Encrypted” property from “Not encrypted” to “Encrypted”. Optionally, select your KMS key or leave it alone, and it will use the default. While you are here, you may wish to change the “Delete on termination” from “No” to “Yes”. This will help prevent any accidental data loss in edge cases, but be aware that this may lead to unexpected orphaned EBS volumes if you don’t go in and clean up your EBS volumes when you delete EC2 instances.

If you forget to turn this on, or you have an existing instance, you can still convert the volume to encrypted. It is a bit of a process though. You need to stop the instance, create an encrypted snapshot, detach the volume from the instance (jot down the device name such as /dev/xvda), restore the encrypted snapshot as a volume, and attach the volume to the instance with the same device mapping.

#aws, #ebs, #ec2, #encryption

Lessons Learned for Windows EC2 Reserved Instances on AWS

March 2017 rolls around and AWS releases awesome new flexibility with reserved instances (RI). You can now split and merge RI’s as well as be automatically be pro-rated on-demand instance costs if you own a lesser RI. I also watch YouTube videos that also explain how this new flexibility works and how great it is. But in the excitement of it all I don’t realize that this new flexibility only applies to regional Linux/UNIX RIs with shared tenancy within the same instance class.

Here’s a case example:
You run an e-Commerce site that runs an m4.large instance. On January 1st 2017 you reserved a m4.large instance for one year. Come December 1st, traffic is expected to double for the Christmas season, so you scale up your instance to a m4.x-large instance type until January 1st.

If Running Linux:
Your annual savings is 38% over on-demand if you were to use m4.large during the entire 2017 year. However jumping up to m4.x-large will increase your bill by about what a m4.large instance would cost on-demand for the month of December 2017. This pro-rated charge is done automatically. There are a couple Linux OS exceptions and hourly Software charges are not calculated in this example.

If Running Windows:
Your annual savings is 20% over on-demand if you were to use m4.large during the entire 2017 year. However jumping up to a m4.x-large will increase your bill by about what a m4.x-large instance would cost on-demand for the month of December 2017. Essentially your savings now are negative due to the fact that your instance is not pro-rated with your RI. This is due to the fact that you are still paying for your reserved instance of m4.large, but it’s not being used. Then on top of that you’re paying for a m4.x-large. As an example, one year of a reserved m4.large costs $1349.04, a savings of $332.88. One month of m4.large not being used costs on average $140.16. This brings your 20% savings down to around 9%. Hourly Software charges are not calculated in this example.

Summary:
When running Linux you have fairly minimal risk involved when getting a reserved instance. However your risk goes up quite a bit reserving a Windows instance. There are a number of options to mitigate that risk level down. One option is to get a convertible RI. This allows you to exchange OS,  family or tenancy. But keep in mind your big picture. For you this may only be good if you think you’ll need to move from a t2 to a m4 family. Another option is you can sell your unwanted RI on the marketplace at a reduced price. When looking at this option, consider how much savings equates to dollars and how much time you’ll need to calculate the risk, estimated savings reduction and time spent selling when selling an RI. Of course different instance types have different savings levels. In the end, it comes down to either a statistician to calculate risk vs. benefit or theories and experience.

In conclusion, I likely wouldn’t bat an eye getting either a standard or convertible RI for Linux if I largely suspected the RI would be needed for at least a year. But I would likely keep a Windows instance on-demand if there was any chance for instability unless I had enough on-demand instances to off-set the risk if one instance no longer matches an RI for a time period.

#aws, #ec2, #instance, #linux, #reserved, #windows

Copying MS SQL 2016 Database on AWS RDS

A common task on a SQL Server might be to copy a database into a new database. This could be on the same server or a different server.

On Amazon Web Service’s (AWS) Relational Database Service (RDS) this task becomes a little more complex to plan and execute. There are a few reasons for this:

  1. You don’t have access to the local file system outside of creating a database in the defaulted path.
  2. You do not have the needed permissions to run “Copy Database Wizard”
  3. Doing a “native” backup/restore using S3 would create a duplicate “family_guid” which is impossible to restore on your RDS instance without deleting the source database.

If you use MS SQL 2016 you can export/import a “Data-tier Application” which is stored as a “.bacpac” file. This is a schema and data native format package (not human readable). In reality it’s a .zip file, so if you open it in something like 7-Zip you can see the package contents. This package is going to be lacking items such as the physical index (the index configuration is intact) and the transaction logs. Therefore it tends to be smaller than an actual native backup.

Keep in mind all data is transmitted from the source machine (AWS RDS) to your workstation. If this is a larger database, you may wish to consider doing this from an EC2 instance to create a faster connection, provide for a larger drive workspace and potentially save on network costs.

Here are the steps to take to backup and then restore a “.bacpac” file. This example is done using AWS RDS, but the same steps would be taken for about any environment including local.

  1. Open Microsoft SQL Server Managment Studio (MSSMS) 2016 or better and connect to your database server.
  2. Right click the source database, go to tasks and “Export Data-tier Application”.
    1
  3. Press “Next” to go to “Export Settings”. Enter a path on your local workstation to save the package to and press “Next”.
    2
  4. After you press “Finish”, it will then begin the copy process from the source machine to your local machine.
    3
  5. If you wish to import the database to another server, connect to it now via the MSSMS.
  6. Right-click the “Databases” group object and select “Import Data-tier Application”. Press “Next”.
    4
  7. Specify the path on your local machine to the “.bacpac” file being imported. Then press “Next”.
  8. Specify a new database name. It can not be the name of an existing database. Press “Next” and then “Finish”.
    5
  9. The new database will be created and imported.
    6

Update 10/29/2018
It appears the “family_guid” issue is no longer an issue. I have not verified it as of yet. See https://aws.amazon.com/about-aws/whats-new/2018/10/amazon-rds-for-sql-server-enhances-backup-and-restore-capabilities/

#aws, #export, #import, #microsoft, #rds, #sql

Buying AWS Unwanted EC2 Reserved Instances

You purchase a year-long EC2 Reserved Instance (RI) from Amazon Web Services (AWS). You’re now saving 30% on your sparkling EC2 instance cost!

Fast forward three months. Your project tanked and is costing you money instead of making money. You need to kill it and kill it fast.

But then you remember that one-year contract you have with AWS. <doomed>

You then remember that you can sell off your RI to a marketplace. Bank account saved – mostly.

That part is easy to research and follow the steps for success.

Now “Wannabe Joe” is looking for a deal and wants to purchase that discounted RI you’re selling off. Joe goes to the EC2 console and clicks “Reserved Instances”. He then proceeds to “Purchase Reserved Instances”.

He sees a paragraph:

Reserved Instances sold through the Reserved Instance Marketplace are identical to those sold by Amazon Web Services, except they may have different prices and terms. For more information about the Reserved Instance Marketplace, go to the Reserved Instance Marketplace web page.

He remembers about the marketplace selling unwanted instances so he clinks on the provided link. Listing, selling, fee and getting paid. All great for the seller. But how does he purchase one. Click-after-click just provides frustration.

Don’t worry Joe. You overthought the whole process.

  1. In the AWS Console Home, go to the EC2 console
  2. Press the “Reserved Instances” link on the left and then press the “Purchase Reserved Instances” button up top.
  3. Choose your platform, types, zone, term and tenancy.
  4. Press the “Search” button
  5. If there are any unwanted instances up for sale, they will be listed under the “Seller” column as “3rd Party”.
  6. Add to cart and away you go.

console_ri_purchase_1

Simple 🙂

Reference and image by: https://aws.amazon.com/blogs/aws/amazon-ec2-reserved-instance-marketplace/

#aws, #ec2, #marketplace, #reserved

CAA DNS Records Provide Additional Domain Protection

In 2013, the CA/Browser Forum passed an intent to allow a DNS domain name (joeblow.com) holder to specify one or more Certification Authorities (CAs) authorization to issue certificates for their domain. No other CAs would be authorized to issue that domain’s certificate.

This is accomplished by the domain holder adding a “CAA” record to their DNS for their domain. This helps mitigate the problem that the public CA trust system is only as strong as its weakest CA.

Organized in 2005, the CA/Browser Forum is a voluntary group of certification authorities (CAs), vendors of Internet browser software, and suppliers of other applications that use X.509 v.3 digital certificates for SSL/TLS and code signing.

View the full ballot.

On August 21st, 2017, Amazon Web Services (AWS) announced that their DNS service “Route 53” now supports CAA records.

#aws, #ca, #caa, #certificate, #dns, #domain

AWS EBS Live Volume Modification Gotcha

We currently run some magnetic EBS volumes for data storage accessed by EC2 instances. Last month AWS announced the availability of Live Volume Modification with Elastic Volumes on EBS. This would enable a volume to expand while being in-use. Where as before you’d have to schedule downtime.

Live Volume Modification is almost a must-have feature for the web servers we run to be cost efficient and reduce any downtime. I have also noted that EBS Magnetic Volumes are now considered “previous generation” technology. (AKA: silent deprecation, just like reduced redundancy S3)

modify-disabledI attempted to expand a magnetic volume on a m3.large instance but found that the modify link was disabled. After a forum post, and the helpful reply from AWS, I found that previous generation magnetic volumes can not be modified while live.

This feature is too important and we will be moving to a SSD volume type instead to enable this feature. However it remains to be seen what restrictions we may have. Documentation states: “Current generation m3.medium instances fully support volume modification. However, some m3.large, m3.xlarge, and m3.2xlarge instances may not support all volume modification features.”

See more information at “Considerations for Modifying EBS Volumes

Forum reference: https://forums.aws.amazon.com/message.jspa?messageID=771210

#aws, #ebs, #ec2, #elastic-volumes, #live-volume-modification, #magnetic

Attach AWS IAM Role to Existing EC2

It has always been one of my pet-peeves that I had to attach an IAM role to an EC2 instance just in case I’d need it in the future. The reason was you couldn’t attach one later.

Attaching a role allows API access to AWS from your instance w/o having to inject API keys, which reduces security and maintainability (you’d have to remember to change out the keys when rotating keys).

AWS has now announced that you can attach an IAM role to an exiting EC2 instance.

  1. Create an IAM role
  2. Attach the IAM role to an existing EC2 instance that was originally launched without an IAM role.
  3. Replace the attached IAM role.

https://aws.amazon.com/blogs/security/new-attach-an-aws-iam-role-to-an-existing-amazon-ec2-instance-by-using-the-aws-cli/

#aws, #ec2, #iam, #role