For many ColdFusion websites, you never have to think about this. But for ColdFusion websites that maintain sessions, keep a bit of data in the session scope, and have a larger page count, session memory may become something you need to consider.
When a search engine spider, AI bot, or other bot hits your site, they do not maintain cookies. To track user sessions in ColdFusion, cookies are generally required. This means that if a request does not have a CFID, CFTOKEN or JSESSIONID cookie, a new session is created.
Let’s say you have an e-commerce site that has 5,000 products. A search engine spider will crawl through all 5,000 product detail pages, creating 5,000+ sessions within a relatively short period of time. ColdFusion’s default session timeout is 20 minutes, so all these sessions disappear within 20 minutes. But we know that they are never needed again after the first request. So let’s get rid of them right away instead of racking up memory.
Your first question would be, why create a session in the first place if we know they are a bot? The answer to that is you may have code that’s dependent on the session scope. If you don’t create the session, or delete it before the rest of the code runs, your code will then error. You could wrap your variable requests in logic, but who wants to do that?
Below is a very basic Application.cfc file that detects if any cookies are defined for your site on the visitor’s browser. Keep in mind that first-time users to your site will have no cookies until the second request if they have cookies enabled. This code will destroy the session after 1 second if no cookies are found. This could be first-time visitors, bots, or spiders. Once cookies are found, it will increase the session timeout to 20 minutes.
Many people approach this by trying to detect keywords in the user-agent header value. While this works much of the time, it may fail down the road if the bot changes the value to something unexpected or if a bot/spider tried to mimic a browser and not be truthful (or just don’t care) about who they are using the user-agent value.
Important: Some may wonder if this affects everyone globally. This code is request-based and only affects this specific request.
component { this.name = hash( getCurrentTemplatePath() ); this.sessionManagement = true; if (!len(cgi.HTTP_COOKIE)) { /* By default, all of our new sessions will be given a very short timeout. This will be true for all users, spiders, and bots. We want sessions to always be enabled since our page request might require it. */ this.sessionTimeout = createTimeSpan( 0, 0, 20, 0 ); } else { this.sessionTimeout = createTimeSpan( 0, 0, 0, 1 ); }}
Another way of doing this, if for some reason you prefer not to use sessionTimeout, is to use the undocumented setMaxInactiveInterval() method in the session scope. The argument is a long int, so you may need to use JavaCast for your use case, but a simple “1” will do the job for our use case.
component { this.name = hash( getCurrentTemplatePath() ); this.sessionManagement = true; this.sessionTimeout = createTimeSpan( 0, 0, 20, 0 ); public boolean function onRequestStart( required string targetPage ) { // see if cookies are found. Bots usually do not pass cookies which are created by ColdFusion session management. if (!len(cgi.HTTP_COOKIE)) { /* Change the timeout on the current session scope to 1 second. While this invalidates the session for subsequent requests, the memory is not always reclaimed instantly. It is reclaimed when the underlying server checks for inactive sessions, which may take a moment. */ session.setMaxInactiveInterval(1); } return true; }}
To monitor how you are doing with session counts being created and destroyed, you can use FusionReactor’s Sessions dashboard under the UEM menu. Here, you can track applications and how they are creating, destroying, and rejecting sessions within the last 5 seconds, 1 minute, and 1 hour.
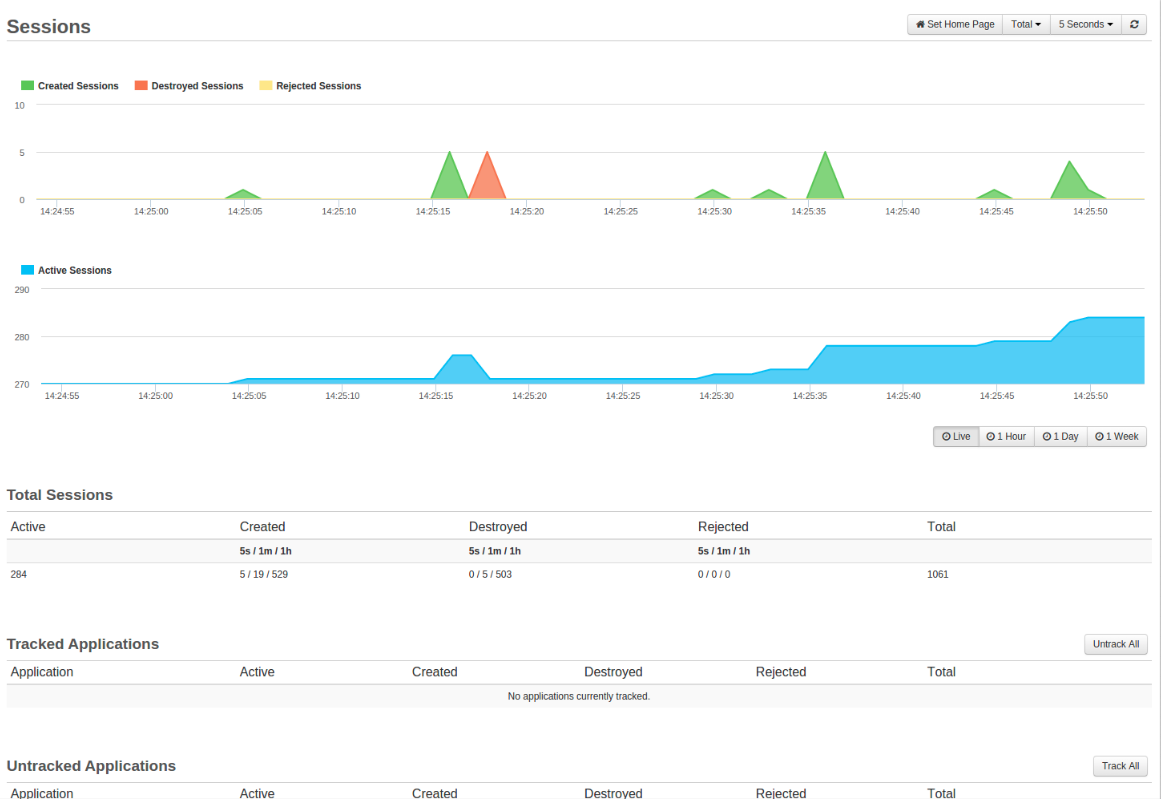
Check out Charlie Arehart’s article on session tracking in FusionReactor.